

How To Repair A Rainbird Valve
Rainbird's residential serial valves have a small internal filter which can become clogged with grit, even with reasonably clean water supplies. When this filter becomes clogged the valve will no longer fully shut when operated automatically. Here's how to make clean the filters.
![]() The reason for the filter is that Rainbird uses a very small port (water passage) for the water flow that helps to power the valve. A hydraulic solenoid valve is actually two valves. A tiny valve called a "airplane pilot valve" is operated by the solenoid, this small pilot valve operates the larger valve. This allows a small-scale 24 volt solenoid to open up fifty-fifty a very big valve. The port in this model of Rainbird valve is smaller than those found in most cheap valves. There is a expert reason for this, a smaller port makes the valve close slower and reduces h2o hammer. The merchandise off is that the super small port easily clogs up. To continue it from clogging, Rainbird has placed a small filter inside the valve. Unfortunately, somewhen this filter becomes clogged up with grit too! When it becomes clogged the valve volition not completely shut. And so it has to be cleaned. Most do-it-yourselfers will have no problems with this relatively piece of cake repair.
The reason for the filter is that Rainbird uses a very small port (water passage) for the water flow that helps to power the valve. A hydraulic solenoid valve is actually two valves. A tiny valve called a "airplane pilot valve" is operated by the solenoid, this small pilot valve operates the larger valve. This allows a small-scale 24 volt solenoid to open up fifty-fifty a very big valve. The port in this model of Rainbird valve is smaller than those found in most cheap valves. There is a expert reason for this, a smaller port makes the valve close slower and reduces h2o hammer. The merchandise off is that the super small port easily clogs up. To continue it from clogging, Rainbird has placed a small filter inside the valve. Unfortunately, somewhen this filter becomes clogged up with grit too! When it becomes clogged the valve volition not completely shut. And so it has to be cleaned. Most do-it-yourselfers will have no problems with this relatively piece of cake repair.
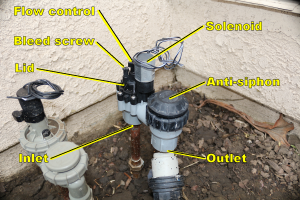
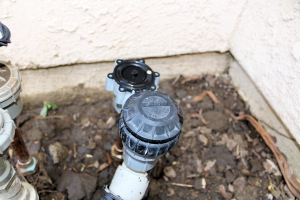
Below are instructions and photos specific to the Rainbird DAS/ASVF, DV, DVF, CP, and CPF model valves (the repair kit part number is #DRK-CP.) The Rainbird DRK JTV/JTVF, JTV, JTV/AS and JTV/ASF "Jar Top" models apply different parts just are very similar (repair kit role number #DRK-JTV.) The repair kits are optional, you may be able to fix the valve without buying new parts. Near other anti-siphon valve brands are similar enough that you will be able to figure it out.
![]() If y'all are repairing a valve other than the DAS model pictured here, accept photos of the valve with your phone camera after y'all remove each part. You tin can apply them to guide you in reassembly.
If y'all are repairing a valve other than the DAS model pictured here, accept photos of the valve with your phone camera after y'all remove each part. You tin can apply them to guide you in reassembly.
Tools & parts: You will need a medium size Phillips screwdriver, a medium size standard flat-blade screwdriver, a toothbrush, and a minor container or plastic bag to put the parts into so they don't get lost. I similar to also have a bucket handy to keep everything in so I'yard not laying stuff in the dirt or mud. Y'all may also need two new water-proof splice connectors if you need to cutting the wires. If you want to replace the parts you volition need i of the repair kits mentioned above and a very small flat-blade screwdriver. See links to example repair parts ads at the bottom of this folio. Most of the time just cleaning the parts is sufficient to repair the valve.
Stride-by-Stride:
Click on the photos to view the full size image.
Don't panic over the number of steps here, I've broken it down into very small "bites" so that even a beginner won't choke on it. 🙂
1. Turn off the h2o supply. Obvious, merely hey, if y'all forget to do it yous volition get a confront-full of water!
2. Fully open the menstruum control on the height center of the valve by turning it counter-clockwise. Tip: There is a screwdriver slot on pinnacle of the flow control in the centre of the knob. I find it is easier to use a standard apartment blade screwdriver to operate the menses command, rather than trying to turn the knob with my fingers.
Now open the drain screw (the smaller of the two knobs on summit of the valve) to release the h2o pressure in the valve, then re-close it. Turn it counter-clockwise to open, clockwise to close.
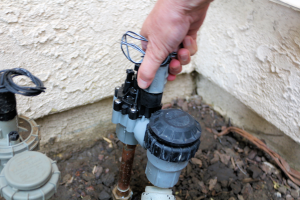
three. Remove the solenoid by twisting it counter-clockwise. You lot may need to cut the wires to do this. Make certain y'all leave enough wire to let yous to reconnect the wires subsequently! In the photos I have already disconnected the wires.
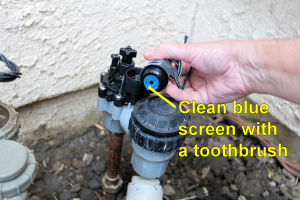
iv. On the lesser of the solenoid is a blue plastic screen. Use a toothbrush to clean information technology, rinsing it with lots of water. You don't demand to remove the screen from the solenoid, just clean the exposed surface. If you bought a repair kit, a new screen is provided in the kit. Pry the sometime screen out of the solenoid using the smallest screwdriver you can find. Exist careful, it should come out easily. Do not wedge the screwdriver in and damage the soft plastic solenoid body or you lot will accept to replace the solenoid!
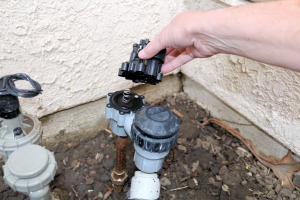
5. Remove the argent screws from the perimeter of the valve lid and remove the valve lid past lifting it straight up.
6. After you remove the valve cap yous volition see the diaphragm with a spring on top of it.
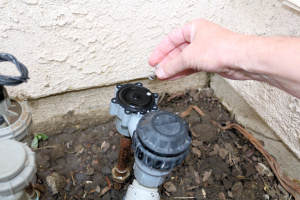
7. Pull the leap off past pulling information technology direct upwardly.
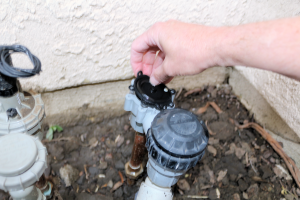
eight. Once you become to the diaphragm in the Rainbird valve you volition probably observe information technology is stuck tight to the bottom one-half of the valve. Carefully and gently peel the diaphragm up by the edges and remove it.
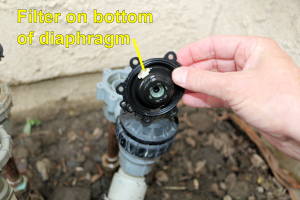
ix. On the bottom of the diaphragm you lot will see a little white plastic filter. Inspect the diaphragm carefully for cracks, tears, rips or any other damage. If it is damaged you demand to get a repair kit, which volition accept a new diaphragm to replace it.
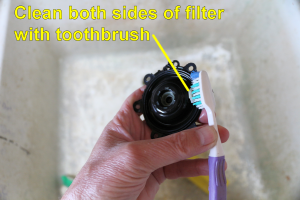
x. Employ a toothbrush to carefully make clean the filter and diaphragm. Clean all the other parts besides.
11. Turn on the water supply and flush out the valve. Turn it on very slowly and then it doesn't make a mess. Get out it on just long enough to be sure anything that might accept fallen inside the valve body while the lid was off gets flushed out. Don't skip this pace! You may call up naught has fallen in at that place, but I'thousand telling yous from experience at that place is a good chance something did and you don't know it. Plus there is probably sand in the lesser of the pipes leading to the valve that came in from the water source and settled there. In the process of working on the valve that sand gets stirred upward. Information technology doesn't do whatever good to repair the valve only to have sand get correct back into it and wreck it the first fourth dimension y'all run it! Then take a minute to flush the pipes out now, while you have the lid off the valve.
Make sure the superlative of the valve trunk is clean, there is a groove in the top surface, make certain no dirt is in the groove. It's easy to become dirt on this surface and not find it when repairing the valve! The valve will leak if you have whatever dirt in the groove. It is really important that everything is clean when you reassemble the valve! I can't over-stress this importance that everything be clean. You merely cleaned the filters, you don't want them immediately clogged up over again!
12. Place the diaphragm back on the valve body, carefully align information technology so that the holes in information technology marshal with the screw holes in the valve body. The little filter plate you cleaned should exist on the lesser of the diaphragm.
Of import: There is a ridge (like an o-ring molded into the border) effectually the perimeter of the diaphragm, press the edges downwards so that the ridge fits downwards into the groove on peak of the valve body. If you don't become the ridge pressed into the groove you tin damage the diaphragm when y'all screw down the lid!
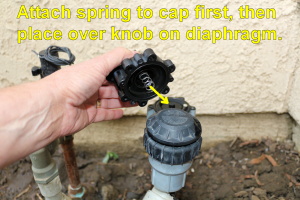
13. This is the trickiest role of this repair. Place the spring within the valve lid. There is a spot inside the chapeau that the jump fits into that centers the spring. If you do it carefully yous should exist able to get the jump to stick into the spring holder. If you can't get it to stay in that location you may have to put the spring onto the diaphragm and just do your best to align the chapeau onto the leap. Now carefully place the chapeau and then the bottom of the jump goes around the protrusion from the top of the diaphragm. Button the hat all the way downward, if everything is properly aligned it should easily press on. Install ane of the lid screws to concur it in identify but do not fully tighten it. Just screw information technology in far enough to pull the lid downwardly so that information technology simply touches the body. When installing the lid screws turn the screw backwards like yous are removing information technology until you feel it "click" into the existing threads. Then reverse management to screw information technology in. The screws should become in easily, if not yous missed the threads, try once again. Do not strength the screws in if they do not turn easily! Keep trying until you find the threads.
14. Insert the remaining screws, alternating from i side to the other. Once more, do not tighten them, but insert them plenty to pull the lid down against the body.
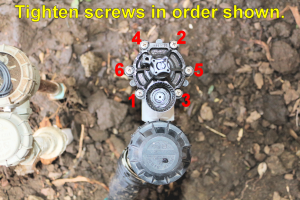
15. Now after they are all in go back and tighten them, once more go from one side to the other. You demand to alternate so you don't warp the lid when you tighten the screws, if you warp information technology ti will leak. Now do a last check of all the screws to exist certain they are all tight.
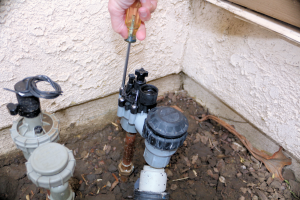
16. Spiral the solenoid dorsum on.
17. Shut the flow command all the style by turning information technology clockwise.
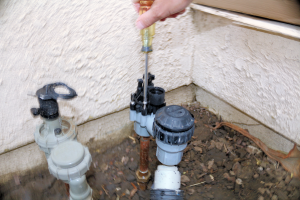
18. Turn on the water.
xix. Open the bleed screw, water volition squirt out, that's supposed to happen. Now slowly open up the flow control, the water will start flowing through the valve. Close the drain screw. The valve should close (don't panic if it doesn't.) If it doesn't close, tap gently on each side of the valve a few times with your screwdriver, tap the top of the solenoid also, to force water dorsum into all the valve cavities and passages. Endeavour closing and opening the menstruum command and as well the bleed spiral a few times. Be patient, on occasion I accept had to repeat this procedure five or more than times earlier the valve started working correctly. When air bubbles become lodged in those tiny ports they tin be very difficult to dislodge.
20. Reattach the solenoid wires to the control wires from the timer. Use waterproof connectors! The #1 crusade of valve solenoid failure is not waterproofing the wire connections. Water is sucked up into the solenoid through the tiny spaces between the wire strands. Then the solenoid rusts within and stops working. All the wire splices must be h2o-tight! You tin can purchase waterproof wire connectors at whatever hardware store. Follow the instructions on the package for installing them.
All done!
Source: https://www.irrigationtutorials.com/rainbird-anti-siphon-valve-leaks-wont-fully-close/
0 Response to "How To Repair A Rainbird Valve"
Post a Comment